30 January 2013

Bitter Gourd Pitlai

Pitlai is a very delicious south Indian gravy dish, which is similar to sambar but with some difference. It is of thicker consistency and is made with spice powders which are freshly ground along with coconut. Pitlai can be made with numerous vegetables like Bitter Gourd, Brinjal, Pumpkin & Chow Chow etc.

The most common pitlai made is Bitter Gourd Pitlai. Bitter Gourd is very healthy vegetable with enormous nutritional health benefits.

Health Benefits of Bitter Gourd:

1. It contains a hypoglycemic compound which is highly beneficial in lowering blood sugar levels in blood and urine and hence a very diabetic-friendly dish.
2. The high beta-carotene & other properties in this vegetable help alleviate eye problems and improve eye sight.
3. Used in the treatment of hangover owing to its alcohol intoxication properties.
4. Immune booster.
5. Helps in weight loss.
6. Reduces hypertension.

The most common reason why the Bitter Gourd is disliked by many is because of its very strong bitter taste. There are few ways to reduce the bitterness of this vegetable while eating, which I will share here.

Know-How : To Remove the Bitterness in Bittergourd

If the bitterness is reduced, this bitter gourd can be very much enjoyed while eating. This Pitlai when prepared in this way mentioned, will surprise you, as it won’t give you even a mildest bitterness and you would simply fall in love with the taste of bitter gourd & start loving it. Regularize with wonderful medicinal food in your diet and enjoy good health.

This Pitlai is best when mixed with plain rice & consumed with any dry curry as a side dish. Today, I enjoyed a wonderful lunch with Bitter Gourd Pitlai & Avial and the combo was simply awesome.

English Name: Bitter Gourd / Tamil Name : Pavarkai / Hindi Name : Karela 

Ingredients:


1. Bitter Gourd – 2 or 3, Slit lengthwise & the seeds removed and then cut into medium sizes
2. Tamarind water – 2 Cups (for Cooking)
3. Tamarind Water – 1 Cup (for boiling Bitter Gourd separately)
4. Toor Dhal – 1 Cup
5. Coriander Seeds – 4 tsp
6. Bengal Gram Dhal / Channa Dhal – 2 tsp
7. Red Chillies – 6-8
8. Fenugreek – ¼ tsp
9. Coconut – 1 Cup
10. Hing – 1 tsp
11. Seasoning : Mustard seeds – 1 tsp, Broken Urud dhal – 1 tsp, Channa Dhal – 1 tsp, Hing – 1 tsp, Curry leaves – 10
12. Salt – 2-3 tsp
13. Oil – 2-3 tsp

Preperation of Pitlai Powder:


In Kadai, add one teaspoon oil and fry together – Coriander, Channa Dhal/Bengal Gram Dhal, Fenugreek, Red Chillies & Coconut until every ingredient turns light brown and becomes aromatic (the coriander seeds aroma should dominate). Cool and powder and keep ready.


 Pre-requisite:

1. Boil the bitter gourd in tamarind water for 15 mins and strain the water completely and wash it under running water and keep it ready for cooking.

 
2. Pressure cook toor dhal for 3-4 whistles. Once cooled, open and mash very well and mix well the Pitlai powder to it and keep ready.


Method:

1. In heavy bottom vessel, add the tamarind water (for cooking ) along with washed Bitter Gourd & let it boil for 15-20 mins until the tamarind raw smell goes and the quantity of tamarind water reduces to half. Add a teaspoon of salt in between.


2. Now add the toor dhal mixed in pitlai powder and give it a stir and let it boil for 2-3 minutes. Check for salt and add more if required now.


3. While the toor dhal boils, prepare the seasoning and pour it on the pitlai and mix well and just allow everything  to cook for another 2 mins. Once the toor dhal is added, the pitlai should not boil much.


4. Remove from the stove & serve with any curry.


29 January 2013

Avial

Avial is one of the most famous traditional vegetable curry found in both Kerala and Tamil Nadu cuisine. In Kerala and Tamil nadu, for many festivals, functions and marriages, you will see the Avial definitely being served. Avial is a vegetable curry made with variety of vegetables & coconut paste & yoghurt. To enjoy the true flavor of Avial it is recommended to use coconut oil. The combination of ground coconut and coconut oil brings such a wonderful aroma to the dish that no one can resist relishing it. Due to its vast vegetable content, Avial is very nutritive for consumption. In one dish, all the vegetables benefits are reaped.

The General Vegetables used for Avial :

Potato, Carrot, Beans, Drumstick, Brinjal, Raw Banana, Elephant Yam, Chow Chow, Broad Beans (Avaraikai), White Pumpkin, Snake Gourd.

Here goes my version of Avial now.

Ingredients:

Vegetables:
Potato – 1
Carrot – 1
Beans – 10
Drumstick – 2
Raw Banana -  1
Elephant Yam – ½
Brinjal – 3

Coconut – 1 to 1 ½ Cups
Cumin Seeds – 1 to 1.5 tsp
Green Chillies – 6-8
Yoghurt – ½ Cup
Haldi – 1 tsp
Salt – 2-3 tsp
Coconut oil – 6 tsp
Curry leaves – 15
Mustard seeds – ¼ tsp

Pre-requisite:
 
1.  Cut all the above vegetables to 2 cms size and soak them in water and keep ready to cook (soaking is done to avoid discoloration of the vegetables).


2.  Cook all the vegetables until they are tender(around 80% cooked) (I pressure cooked the vegetables allowing just one whistle). Don’t overcook and mash the vegetables, it will be a spoiler.


3.  Grind to a thick paste adding very little water – Coconut, Cumin seeds and Green Chillies.


4.  Mix yoghurt & haldi & the ground cocounut paste together & keep ready.


Method:

1.  In a Kadai/Non Stick Pan, first add the vegetables first, then add the ground coconut paste & then the yoghurt & finally required salt and mix everything well.  While mixing ensure the vegetables don’t break. A mild tossing of vegetables is enough.

2.  Now switch on the stove, keep the above kadai/non stick pan and cook on low flame until you see mild bubbles coming up (or) slight frothing from the mixture. Mild cooking is done to remove the raw smell from the coconut & yoghurt. Don’t allow the Avial to cook for long time, otherwise the yoghurt will turn sour or may even spoil. Just 2-3 mins of cooking is enough.


3.  Season in coconut oil along with mustard & curry leaves and pour the seasoning to the avail mixture and mix few times, and remove from the flame.


Tantalizing Avial is Ready!!!


Onion Coconut Chutney

Onion Coconut chutney is very tasty chutney made with small onions and coconut. All the ingredients in this chutney are well friend and ground to a paste. This chutney has a light reddish-brown colour when done. If you are bored of the regular coconut chutney, try this for a change and enjoy a different tasty chutney. I generally make this chutney as a side dish for Parupu Adai  and I find that combo simply delightful. This chutney goes well even for Pesarattu.

Best side dish for: Dosa / Adai / Pesarattu

Ingredients:

S. Onion – 10 peeled
Fried Gram Dhal (Potukadalai) – 2 tbsp
Red Chillies – 6
Tamarind – small ball
Coconut – 1 – 1 ½ Cups
Salt  - 2 tsp
Oil – 2 tsp
Season: Oil – 1 tsp, mustard – ½ tsp, broken urud dhal – ½ tsp, curry leaves – 6


Method:

1.       In Kadai, add a teaspoon of oil and first add the red chillies , tamarind and small onions and fry till onions become translucent .


2.       Add the fried gram dhal and fry until it becomes light brown.


3.       Finally add the coconut and fry until coconut becomes light brown. 


4.       Switch off & cool everything and then grind to a smooth paste adding required salt & water & transfer to a vessel.


5.       Season as mentioned & pour the seasoned ingredients onto the chutney and mix well & serve.


28 January 2013

Pesarattu

Pesarattu is a very famous Andhra specialty dish made from Green gram dhal. It is similar to dosa. Typically pesarattu is filled inside with rava upma and served in certain parts of Andhra. The ideal side dish for pesarattu is Ginger Chutney. But you can even enjoy the combo of pesarattu with tomato chutney, onion chutney etc.
There are lots of health benefits you get by regularizing  pesarattu in your diet. The green gram dhal immensely helps in keeping a good health. So enjoy pesarattu and make it a part of your regular diet.

Health benefits of Green Gram Dhal: 
 
1. It is very rich in protein.
2. Has high levels of iron and folate  which is very much required for pregnant women and feeding mothers.
3. Contains high fiber which improves digestion.

English Name : Green Gram Dhal / Tamil Name : Paccha Payaru / Hindi Name : Moong Dhal


Best  Side Dish : Ginger Chutney / Onion Chutney / Tomato Chutney
 

Ingredients:

1. Green gram dhal – 2 Cups
2. G. Chillies – 5-6
3. Ginger – 3” or 4” pieces
4.  Cumin Seeds – 1 – 2 tsp
5.  B.Onion – 2 – finely chopped

Pre-Requisite:

 1. Soak Green gram dhal in excess water for 8-10 hours and drain all the water and keep ready.

To Grind:

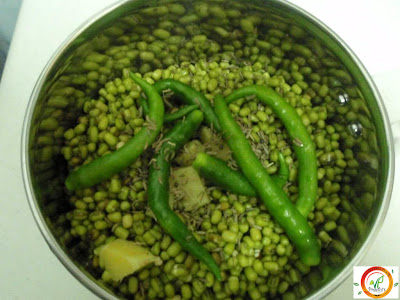
1. Grind the soaked & drained Greem gram dhal + g. chillies + ginger + cumin seeds + salt to a fine paste. The consistency should be similar to a dosa batter.


Method:

1. Heat the tava and drizzle oil in the tava and pour a ladle of this batter onto it and spread it into a circular motion from inside to outside & add a teaspoon of oil on its sides and top.
 
2. Sprinkle the chopped onion on the top of the pesarattu and allow the pesarattu to cook until brown spots appear around the corner of the bottom portion.


3. Once brown colour is spotted, turn over the pesarattu and allow the portion with sprinkled onion cook until the onions are down and brown colour spots appear in the inside portion. 


4. Remove from the tava and serve with any chutney of your choice.

26 January 2013

Baby Potato Roast

Baby Potato is the small size version of the normal potatoes, which are very tasty to consume. The most common form of cooking this baby potato is to make a roast, which goes deliciously well with any South-Indian sambar. Due to its small size, this potato gets cooked fast. While cooking this baby potato, the potato is pricked to make small holes, so while roasting it absorbs the spicy juices of the powders spread into it. So the tasteful spicy flavor comes from within the potato as well. This is a very ideal weekend extravaganza that you can treat yourself with. But in order to make this dish very tasteful, little extra oil is used. When you want to make an exception to your taste buds from your regular diet with a tempting & tasty flavorful food, Baby potato would be a good choice. 


Ingredients: 

Baby Potato – 15-20
Red Chili Powder – 2-3 tsp
Oil – 8-10 tsp
Salt – 2-3 tsp
Seasoning Ingredients: Mustard – 1 tsp,  broken urud dhal – 1 tsp,  channa dhal – 1 tsp,  hing – ¾ tsp, curry leaves – 10-12
 
Pre-requisite: 

1. Cook Baby Potato in pressure cooker for about 2-3 whistles max and remove.
2. Cool & open and peal the baby potato skin.
3. Using a fork, prick the baby potato randomly on all sides, making holes in it & keep ready. This is to ensure the potato absorbs the flavor of the spice inside it. 


Method: 

1.       In Kadai/non-stick vessel, pour 4-5 tsp of oil and allow it to become hot. Then drop the baby potatoes (cooked, peeled and pricked) into it and mix gently (so it doesn’t break) and cook for 3-4 minutes without disturbing the potatoes.


 2.       Now, add a teaspoon of salt and gently toss the potatoes around. 

 3.       You will notice light brown colour on the bottom portion of the potatoes after tossing upside down. Cook for 3-4 minutes without disturbing the potatoes.


4.       Now add required chili powder and salt and mix the contents gently. If oil is required, add some more oil now by spreading it around the potatoes and at the centre for uniform roasting.


5.       Repeat step 3 once in every 3-4 minutes until all the sides of the potato is roasted brown (don’t burn it to black colour). When tasting the potato the flavour of the chili powder should taste from within. 


6.       Season with seasoning ingredients, and pour this onto the roasted potato. Gently toss the potato after seasoning to mix well.


7.       Remove the potato from the stove.

23 January 2013

Okra Masala

Okra is a very healthy vegetable for consumption to enjoy good health. There are various health benefits one gets out of eating this green vegetable.

Health Benefits of Okra:

1. A Very low calorie vegetable.
2. Rich source of dietary  fibre.
3. The okra pods contains healthy amounts of Vitamin A.
4. Fresh pods are good source of folate, which is very much needed for pregnant women.
5. Rich in B-Complex.
6. Important source of iron, calcium, magnesium & manganese.


Okra can be prepared in variety of ways to enjoy its taste in our daily cuisine. It can be prepared as a dry curry, kozhambu/sambar,  gravy, pachadhi and thovayal etc. Okra Chips , where the okra is cut into small pieces and deep fried in oil and spiced with hot powders is a sure hit with kids at home. Generally it is said that if okra is given to children regularly it helps in boosting their memory power and particularly in doing maths well.  When I was young, whenever mom makes the okra curry, she always emphasize how important this vegetable is for our memory and insists we take it regularly.

This version here is the “Okra Masala” (bindi masala) – a gravy version of okra used ideally as a side dish for Indian breads. In this recipe, amchur powder (dry mango powder) is used as an optional ingredient. The amchur powder gives a very mild tangy taste to the okra masala, which some may like. If you are not for it, you can omit this ingredient. So, enjoy making & eating this healthy dish.

English Name : Okra / Tamil Name : Vendaikai / Hindi Name : Bindhi

Best Accompaniment for : Chapathi / Roti / Phulka

Ingredients:

Okra  – 20-25 (washed and dried)
Onion (Med) – 2 - Chopped
Tomoto (Big) – 2 – Chopped
Ginger-Garlic paste – 1 tsp (optional)
Red Chilly powder – 2 tsp
Coriander Powder – 2 tsp
Turmeric Powder – 1 tsp
Salt – 2-3 tsp
Cumin seeds - 3/4 tsp
Oil – 6-8 tsp
Dry Mango Powder (Amchur Powder) - 1/2 tsp (Optional)


Pre-requisite:

1. Cut the Bindi into 1 cm to 1.5 cms pieces and keep ready.
2. In Microwave: In MW Vessel, Add 3-4 tsp oil, spread the cut okra and cook HIGH for 4 minutes. Remove & sprinkle little water on the okra's and again cook HIGH for 4-6 minutes, till okra is 70% cooked and soft and then remove.
           (or)
In Kadai : Add 3-4 tsp oil, and fry the okra for 10 minutes, until it becomes 70% cooked and soft. Sprinkle little water in between while cooking the okra.

Don’t allow the okra's to dry too much & become crispy. It should be little soft while eating.

Method:

1. In Kadai, add oil and when it is hot, add cumin seeds and fry for few seconds.


2. When cumin seeds are fried, add the ginger-garlic paste and fry for few seconds (this is optional).

3. Then add onion and sauté till translucent.


4. Then add tomato and sauté till tomato becomes mushy. Add the turmeric powder and required salt now.


5. Then add chili powder & coriander powder and mix well.  If oil is less, add 2-3 tsp now. Cook till oil oozes from the mixture.


6. Add the cooked okra to the above and mix well , add little more salt if needed. Sim the flame and cook covered for about 5-10 minutes stirring in between. If dish becomes too dry, sprinkle little water while cooking everything in kadai.


7. Optionally now add 1/2 teaspoon of dry mango powder (amchur powder) and mix well.

8. Once okra is well cooked with the masala’s, add crushed kasoori methi and mix well.

9. Before removing, garnish with coriander leaves & remove.


22 January 2013

Garlic Chutney

Garlic chutney is a simple & jiffy chutney. This chutney goes very well with Dosa more than Idly. Even though this chutney uses couple of other ingredients, the chutney emanates a strong garlic flavor while eating, which makes its taste quite unique. Garlic lovers are sure to enjoy this chutney. This chutney requires no seasoning. It can be consumed directly after grinding it.

I learnt this recipe from my mother-in-law.

Best Side Dish for : Dosa

Ingredients:
 
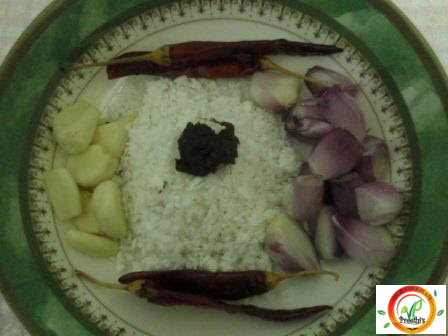
1.       Garlic – 6-8 pods, peeled
2.       S.Onion – 6 pieces , peeled
3.       Red Chillies – 5-6
4.       Tamarind Ball – small ball
5.       Coconut – 1 Cup
6.       Salt – 2 tsp
7.       Oil – 2 tsp


Method:
 
1.  In Kadai, add oil, when it becomes hot, add the garlic and s.onion and just fry for few seconds. No need to deep fry. This is just to ensure that the raw smell of the ingredients goes.


2. Cool the above and in the mixie, first add the red chillies (raw), tamarind (raw), coconut and grind to a coarse consistency adding little water.


3. Finally add the small onion and garlic and grind it just enough for the garlic and onion to crush well and then remove.


4. Transfer to a bowl and enjoy it with hot dosa.


Moong Dhal Dosa

Moong Dhal Dosa is a very healthy and easy to make dosa. It is healthy because of Moong dhal, which is a rich protein source and it is easy because this dosa can be made instantly without the need to ferment the batter as we do for the normal dosa batter. Also, no extensive soaking is required for this dhal. Just 3-4 hours of minimal soaking is enough. However, I generally soak this dhal in the morning and prepare it for the night (this practice comes out of the habit of soaking dal’s overnite for dosa/idlies). The grinding of the batter need not be done in the grinder, mixie/blender is sufficient. Include this healthy dosa in your menu and reap the benefit of this protein supplement from your diet.

Best Side Dish: Onion Chutney / Tomato Chutney / Garlic Chutney /  Vegetable Kurma

Ingredients:

Moong Dhal – 2 Cups
Ginger – 2 “ piece
G. Chillies – 4
Jeera – ¼ tsp
Salt – 2-3 tsp

Pre-requisite:

Soak the moong dhal for min 3-4 hours or max of 6-8 hours and grind the dhal along with ginger, g.chillies, jeera and salt, to a dosa batter consistency using a mixie/blender.


 Method:
1.       Heat the Dosa tava and drizzle some oil on it after it becomes hot.

2.       Now take a ladle (karandi) of batter and drop it into the centre of the tava and spread it in circular motion from inside to outside in clockwise direction, like a normal dosa.


3.       Pour a teaspoon of oil on the sides of the dosa and on top of it and allow it to cook for a min, until you see the corners becoming light brown.

4.       When the corners become brown, using the spatula, turn around the dosa and allow the inner side of the dosa to cook well & become brown.


5.       When both sides are browned, remove the dosa from the tava and transfer to a plate.


6.       Serve this moong dhal dosa with any chutney / gravy of your choice.